
There is a library’s worth of bad information out there about how to purge sand from clams, ranging from mythical to downright scary. Hopefully I can set the record straight. Here’s what you need to know to get the grit out of your clams.
Let me start by saying that the vast majority of clams, mussels and oysters you buy in the market have been purged already. You will almost never need to purge your clams if you bought them at a supermarket. The exception is if you buy from a small purveyor, and in that case just ask: Have you purged your clams?
Wild clams and mussels are an entirely different story.
They should always be purged, clams especially. Different clams need different purging times, too, depending on how and where they live. Hard shell clams in clean sand, like Eastern surf clams, cockles and quahogs, tend to be easier to purge than open-shelled clams like steamers, horseneck clams and geoducks. The worst of them all is the Western bent-nosed clam, which lives in dense mud and can take days to purge.
Adding corn meal to the purging water does nothing.
There, I said it. Think about the biology of a clam for a moment to understand why. Clams are filter feeders. The reason they have sand and grit in them is because they live buried in sand or mud. This proximity to grit naturally gets the stuff into the clams, which filter with their shells partially open — which is how the sand or mud gets in. Clams filter microscopic particles, not stones or grains of sand — or corn meal. Clams don’t have gizzards. They don’t need grit to do their jobs. Grit in your shell is just a side effect of being a clam.
The myth is that corn meal somehow causes a clam to “cough up” more grit than it normally would, or that the clam “eats” the corn meal and spits out grit. Well, to test that I did an experiment:
First, I let 50 Western littleneck clams purge themselves for 18 hours in seawater. They expelled about 47 grams of grit (weighed after drying) after about 18 hours.
Next, I added exactly 150 grams of coarse corn meal to the purging water and let another 50 Western littleneck clams purge themselves for 18 hours. After that, I carefully removed the clams, poured off the water and spread the corn meal out on a baking sheet to dry completely. Then I weighed it again. The corn meal plus grit weighed 196 grams. You would think that if clams had “eaten” the cornmeal, there would be a decrease in the dry weight of the meal after 18 hours, no?
If you were to bury clams in cornmeal, yes, some would get inside them the way sand does in the wild. But why bother?
Purging clams is mostly a function of time, with oxygen and temperature as ancillary factors.
The single most important ingredient you need to purge your clams of grit is seawater.
This is not so hard to obtain if you are getting your own clams. Bring a 5-gallon bucket and fill it 2/3 of the way up with seawater as you leave the clamming grounds. Armed with this, you can purge virtually any clam. Oh, by the way, you cannot purge a clam in fresh water. Fresh water kills clams. And dead clams are, with few exceptions, no good to eat.
Why is bringing home seawater so important? Because clams live at different salinity levels. The average salinity of the ocean is 35 parts of salt per 1000, but in some wide, shallow clam beds the salinity climbs far higher through evaporation. In other beds, the salinity is lower because the clams are near an estuary where fresh water flows. If you bring seawater from where you dug the clams, you need not guess at how salty your soaking water should be.
If for some reason you forgot to bring back seawater, you can recreate it decently by remembering that 35 parts per thousand ratio. Go buy sea salt — actual sea salt, not rock salt, not iodized salt — and dissolve 35 grams of it (about 2 tablespoons plus another teaspoon) into each 1000 grams of non-chlorinated water, which is about 1 liter. You’ll need enough to submerge your clams.
If you want to get fancier, you can use a hydrometer, which measures water density. Where I do a lot of my clamming in Tomales Bay, the average salinity would read 1.024 in terms of specific gravity. This equated to 1/3 cup finely cut sea salt to a half-gallon of non-chlorinated water. Chlorine, needless to say, is not good for living things. What’s your area’s normal salinity? Google it. I bet some scientist somewhere has measured the salinity where you dig clams and put it online.
Temperature matters.
Shock kills clams. Put clams living in 75°F water into the fridge and they will not be happy — and open-shelled clams will die. The reverse is also true.
Carry your clams home in your seawater and they’ll be fine. They will acclimate to the changing temperature as you drive home. If it’s really hot or cold out, put everything in a cooler. Keep in mind that clams are capable of filter feeding at temperatures as low as 34.5°F and as high as at least 78°F, which is realistically as warm as you will get in a normal indoor room.
If you’re clamming in winter, where the water is cold, go ahead and do your purge sand from clams in the fridge. But if it’s summer, keep your clams at room temperature, or, ideally, a place a bit colder, like a basement.
How long? Even an hour will help. But you can purge your clams as long as there is oxygen in your seawater. Leave your clams too long, and they suffocate and die. Overnight is what I normally do with a 50-clam limit of Western littlenecks and 4 to 10 horseneck or Washington clams. I submerge the clams by about 1 1/2 to 3 inches of seawater and cover the container they’re in — clams spit water, so you don’t want them sprinkling the inside of your fridge or basement.
So, to sum up, this is how I purge sand from clams:
When you are done digging, fill a large bucket full of seawater to take home. Put your clams in it for the drive. If the temperature is very different between the water and your car, put everything in a cooler.
At home, quickly wash every clam under cold tap water to remove mud or grit on the outside of the shell. Put the clams into a large non-reactive container (galvanized steel will kill them, for example). I use a big Tupperware-style container.
Either let the seawater you brought home settle for 20 minutes or so, or filter it through a paper towel. You want it as grit-free as possible. Pour the water over the clams, covering by 1 to 3 inches. If you are purging especially muddy clams, hold back any remaining seawater — you’ll need to change it in a day.
Set the clams in the fridge, at room temperature or in a cool place — somewhere where the temperature is reasonably close to the water they were in — and leave for at least an hour, and up to 20 hours. Check on them once in a while: Most of them should have their siphons out. You will see a lot of icky stuff all over the bottom of the container. Repeat this process for especially muddy clams.
When you are ready, rinse the clams again. Hard-shelled clams can go into the fridge. Open-shelled clams need to be eaten or shucked.
Hank Shaw is a chef, hunter, angler, forager and wild-foods expert constantly on the lookout for new things to gather, catch and eat. He is the author of four wild-game cookbooks: “Hunt, Gather, Cook: Finding the Forgotten Feast” (2011); “Duck, Duck, Goose: Recipes and Techniques for Ducks and Geese, both Wild and Domesticated” (2013); “Buck, Buck, Moose: Recipes and Techniques for Cooking Deer, Elk, Moose, Antelope and Other Antlered Things” (2016); and “Pheasant, Quail, Cottontail: Upland Birds and Small Game from Field to Feast” (2018). He is a contributing editor at The Virginia Sportsman.
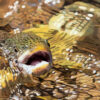
Cover photo: Wild clams should always be purged, and seawater is the most important ingredient needed for purging, especially if it’s seawater from where you dug your clams. Photo by Holly A. Heyser